Installing tile isn’t just about preparing your work area, getting the correct layout, or mastering your grout and finishing skills. Tile transitions are just as important.
What are tile transitions, and why do they matter? A tile transition is the point where tile intersects with another surface, whether that’s carpet, hardwood, LVP, or a different type of tile. Transitions refer to both the material change and the strip or profile used to create a finished edge at the junction.
Let’s explore how to plan tile transitions that are clean, functional, safe, and aesthetic. We’ll look at types of tile transitions and how to use them when joining tile with carpet, wood, and other tile.
Types of Tile Transitions
Tile is durable, but you can’t usually switch from one flooring material to another without a transition material. Skipping transitions can create tripping hazards, create gaps for dirt, and put the edges of your tile at risk of chipping or cracking.
Most tile transitions fit into these broad categories:
- Edge Trim: Material that caps the raw edge of tile. It is usually used to protect the tile from damage, give it a finished look, and create a less sharp edge.
- Tile Transition Strips: Material used to create a junction that bridges the gap between two surfaces. They are designed to give a finished edge to both flooring materials and manage height differences.
- Transition Joints: A grout or caulk treatment that joins seams between tile surfaces, such as where two different kinds of tile meet or where a tile floor meets the wall.
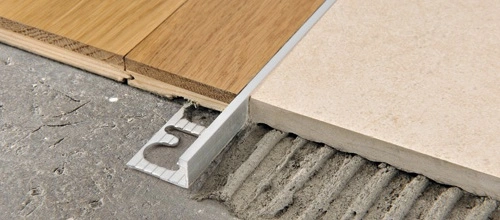
Note: Some edge trims, such as Proterminal by Progress Profiles (pictured below), can also serve as a transition between two flooring surfaces. Its L-shaped design caps the exposed edge of the flooring material while creating an attractive joint between two surfaces of the same height.
Types of Tile Transition Strips
When working with tile in your home, you are most likely to use tile transition strips. It helps to understand the most common types of strips:
- T-molding is a T-shaped strip that spans the gap between two materials and is anchored in the middle to the subfloor. It is commonly used where tile meets hardwood or LVP that’s at the same level.
- Reducer strips have a sloped profile that creates a smooth transition from a higher surface to a lower one. It is commonly used where tile meets carpet or thin vinyl flooring.
- Threshold bars are used in doorways and hallways where the flooring often changes from one type to another. In addition to providing a transition, threshold strips also create a physical barrier against moisture, such as from bathrooms or exterior doors.
Although the design varies across different transition strips, most have a track attached to the subfloor before the transition strip is snapped into place over the seam of the flooring.
How to Transition Carpet to Tile
Carpet transitions can be difficult because you need to consider the thickness of the carpet pile and the carpet pad.
- When the tile is about the same height as the carpet, you can usually use a carpet bar. A carpet bar is a wooden, metal, or vinyl strip that holds the carpet edge under tension, preventing fraying or shifting.
- If the carpet is significantly higher than the tile, you will want to use a reducer strip. A reducer strip also protects the carpet edge, but its primary purpose is to create a sloped transition from thick carpet to thinner tile.
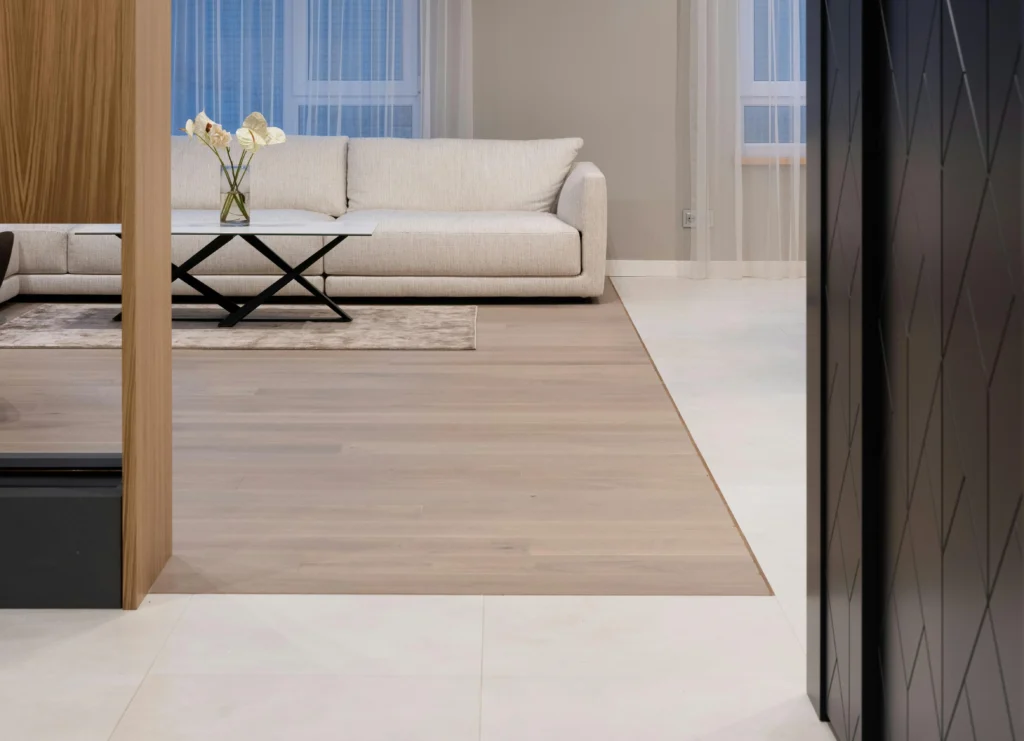
How to Transition from Tile to Wood
Although both tile and wood floors are smooth, there is usually a height difference because the tile is set in mortar. As with carpet, you can use a sloped reducer strip to eliminate the abrupt edge between the two heights.
For tile and wood flooring that are the same height, t-molding or L-shaped edge trims create the cleanest result. Regardless of the transition you use, keep in mind that wood and LVP flooring can expand and contract with humidity, so you will want to plan your layout with a small gap on the wood side.
How to Design a Tile-to-Tile Floor Transition
Tile-to-tile designs may not seem that common, but they come up more often than you might expect. Bathroom flooring meeting a mosaic shower, mudroom tile running into a patterned entryway, or a transition from kitchen tile to hallway tile are all common.
When tile heights are slightly different, you will want to use t-molding to bridge the gap. In many cases, tile heights will be the same, but transition strips can still make the design look intentional rather than abrupt. Strips don’t have to be raised to be effective. In fact, low-profile strips that are the same level as the tile can add an attractive accent between two types of tile.
How to Install a Floor Transition Strip
While you will want to follow the specific installation instructions that come with your transition strips, these basic steps will help you understand the process.
The most important takeaway from this process is to take measurements before choosing a transition type. Transition materials are not one-size-fits-all, and choosing the wrong type or size can derail your installation.
- Measure the height of each flooring material at the transition point.
- Select a transition profile type based on your flooring measurements.
- During installation, cut the strip to length using an appropriate method, such as a saw or metal cutting blade. Aluminum can often be scored and then snapped to length.
- Secure the transition track to the subfloor with the appropriate type of screws or fasteners (concrete screws for a slab; wood screws for plywood).
- Plan your tile layout so that the last course of tile comes flush with the transition track.
- Use color-matched caulk, not grout, at the transition joint so that the transition strip can remain flexible at movement points.
- Snap or press the transition strip onto the track.
Get Started with Your Tile Installation Today
Installing tile takes a lot of planning and prep work, but learning about transition strips is a great way to set your project up for success.
The most important thing to keep in mind is that you will want to plan transitions when choosing tile and other flooring types, not after the fact. By considering this during the design phase, your flooring transitions can become an intentional part of your layout rather than looking like an afterthought.
Our experts at Tile X Design are here to help, no matter what stage you’re at with planning a tile project. Visit our showroom in Plymouth to get inspired, or contact our team for expert assistance with choosing tile you’ll love.