Removing old floor tiles sounds daunting. You may dread the task or wonder how much time and investment it actually requires. But putting off tile replacement can prevent you from enjoying the fresh, new look you deserve.
There are numerous reasons why homeowners need to remove floor tile. However, here are 10 common scenarios—one of which you may find yourself in now:
- Your tiles are cracked or damaged beyond repair.
- A room’s floor tiles no longer fit its decor due to other updates you’ve made.
- Someone incorrectly installed your tile, resulting in uneven or loose tiles.
- Your floor tiles have become discolored or stained, making cleaning difficult.
- The tiles are causing moisture or water damage to the subfloor.
- Your tiles are part of a larger renovation project that requires a new floor surface.
- Older tiles contain asbestos and must be removed for health reasons.
- A room’s floor tiles obstruct access to plumbing or electrical systems that you need to access.
- Your tiles are a safety hazard due to their slippery surface or unevenness.
- The tiles are causing allergic reactions or respiratory issues due to mold or mildew growth underneath them.
Step-by-Step Guide: How to Remove Tile from Floor
So whether you’re replacing old tile for new non-slip features and added durability or looking to improve your home’s aesthetics and vibe, this step-by-step guide on how to remove floor tile will make you feel like a pro.
Step 1: Get the Gear
Before removing your old floor tiles, gathering all the necessary tools and materials is essential. Specific tools you’ll need include:
- A hammer
- Chisel
- Pry bar
- Safety glasses
- Gloves
- Dust mask
- Bucket for debris
Additionally, you may need a floor scraper, adhesive remover, and a floor buffer if older tiles are difficult to remove. Wear appropriate clothing and shoes to protect yourself from any potential hazards.
Step 2: Prepare the Area

Trust us that preparing your tools and workstation before you begin will help you stay in the groove and avoid having to stop mid-removal to grab forgotten items or move heavy furniture.
Remove any obstacles from the room and cover any remaining items with plastic sheeting to protect them from dust and debris. Next, turn off any electrical outlets in the room and remove any baseboards or trim that may be in the way. Be sure to open windows or use a fan to ventilate the area and prevent dust buildup.
Step 3: Remove the Grout

Grout is the material that fills the gaps between the tiles and holds them in place. Use a grout saw or rotary tool with a grout removal bit to remove the grout.
Wear safety goggles and a dust mask to protect yourself from flying debris. Carefully run the tool along the grout lines, careful not to damage the tiles. Once you remove the grout around the tile piece, use a putty knife or chisel to pry up the tiles gently.
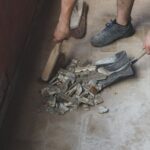
Step 4: Get Loose!

After removing the grout, it’s time to loosen the tiles. As mentioned, once you remove the grout, try prying it up with a putty knife or chisel. If the tile doesn’t come up easily, use a hammer and chisel to break it into smaller pieces. Be sure to work slowly and carefully to avoid damaging the subfloor.
Step 5: Remove the Tile & Clean Up
Once you have removed the desired tile pieces, it’s time to clean up the area. Use a scraper or putty knife to remove any remaining adhesive or grout from the subfloor.
You can also use a chemical adhesive remover if necessary. Read the manufacturer’s instructions carefully and follow all precautions, especially if you have kids and dogs that can access the area. Once the subfloor is clean and smooth, you’re ready to install your new flooring. If you need tips on tiling your bathroom floor, we have just the DIY guide for you!
Tired of Looking at Outdated Floor Tiles?
Get the style and functionality you deserve with stunning Tile X Design options. Browse our online collections and request a free sample to plan your design. You can visit our showroom to see our collections during regular business hours or schedule an appointment to meet with one of our design experts during regular business hours.
For more inspiration, follow us on Instagram, and remember to follow our blog for more tile spotlights, how-to tips, guides, and resources!